A Step-by-Step Guide to Creating Instagram Reels for Real Estate Agents
We know keeping up with marketing trends and social media platforms can seem like a full-time job on top of the one you already have.
But when it comes to standing out in a competitive marketplace, your brand is the best tool to have by your side, and Instagram Reels can be an amazing asset for maximizing your brand’s awareness.
And if that’s not enough to convince you to start making Reels today, a recent study found that on average the average reach rate of 30.81% is double compared to the other’s Instagram content formats.
That means 40% more potential clients you can work with from just one video.
Whether you’ve been hesitant to jump into the Reels game because you think it’s too much work, don’t have the time, or are just plain old intimidated, it is an incredible opportunity to set yourself apart and tap into an untapped market of potential leads your competitors aren’t.
And that’s why we’ve given you a step-by-step guide on how you can get the most out of your Instagram videos for your real estate business.
What Are Instagram Reels?
Instagram Reels are short video clips, between 15 and 90 seconds long–usually set to music–that can be shared as stories, posts, and even featured on a dedicated Reels tab on your profile.
You can find Instagram Reels by clicking the play-like button that’s dead center on your navigation bar. This page is a feed for all things Reels, though you’ll also find posted Reels on your home tab and the Explore page.
Why Agents Should Be Using Instagram Reels
Instagram Reels are meant to be short video clips short video clips usually set to music that can be shared as stories, posts, and even featured on a dedicated Reels tab on your profile.
You can find Instagram Reels by clicking the play-like button that’s dead center on your navigation bar. This page is a feed for all things Reels, though you’ll also find posted Reels on your home tab and the Explore page.
Build Your Following
Reels are the most popular type of content on Instagram, meaning they provide you with even more opportunities to engage with your followers. Stronger engagement leads to more reach, and more reach can land you on the Explore tab. Get your Reels on the Explore tab, and you’ll expose your brand to thousands of brand-new users who may never have interacted with your brand before—for free.
Boost Your Brand Awareness
Not everyone cares who the author of a Reel is—they just want to watch, laugh, and go on with their day. However, you can add subtle branding elements (logos, brand-associated colors, captions, text blocks, stickers, etc.) to boost brand awareness without being sales-y or over the top.
Develop Your On-Camera Presence
Practice makes perfect, right? The more you work at a skill, the better you’re going to get. The short format and entertaining nature of Instagram Reels provide you with a great opportunity to practice your on-camera skills so that you can develop your confidence in a low-risk environment. Instagram is a great place to get creative and try out new things, especially given all of the creator tools provided to you with Instagram’s in-app editor.
How to Create Instagram Reels for Real Estate
When you’re creating Reels, try to think of the video from your audience’s perspective. What sort of videos do you like to watch when scrolling through social media? What aspects of a video grab your attention and make you want to keep watching it?
Since Reels are short-form videos, it’s important to capture your audience’s attention within the first few seconds. You can do this using movement, captions, & on-screen text at the beginning of your video to hold viewers’ interest.
Instagram’s Reel creator is currently only available on their mobile platform, meaning it’s important to get comfortable making videos using your phone. You can upload a previously recorded video to share as a Reel, or you can record right within Instagram’s Reel creator.
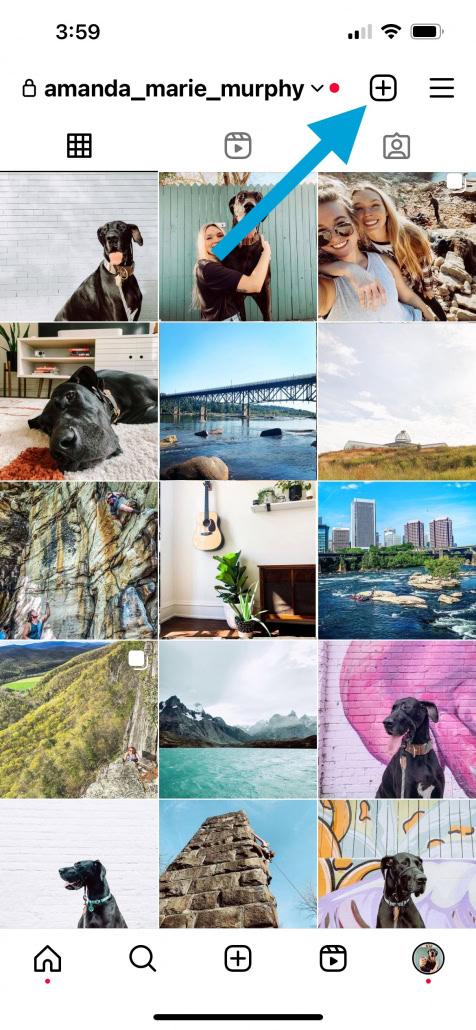
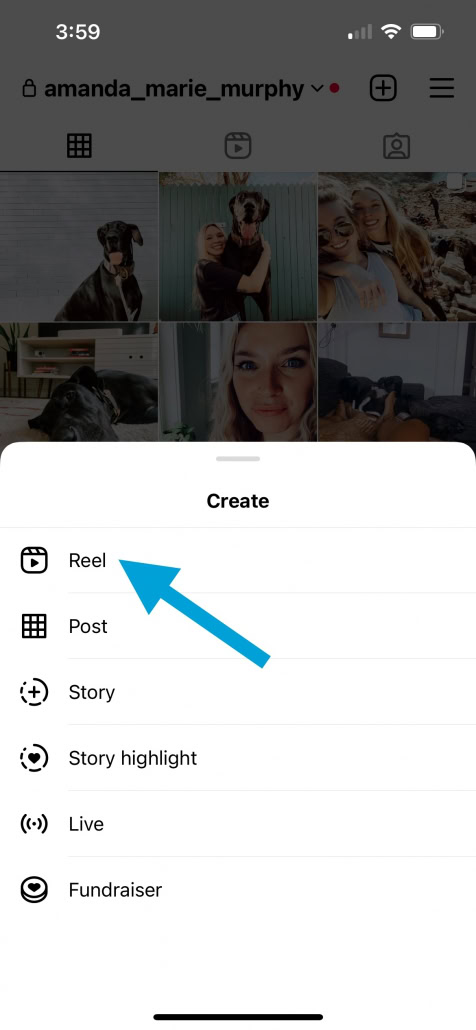
Regardless of whether you’re uploading a video or recording a new one, to create a Reel, open the Instagram mobile app and navigate to your profile. Once there, tap the plus icon in the upper-right corner to open the Reels camera.
In advance, please excuse all the funny faces made in the process of creating this guide.
Step 1: Upload a Video
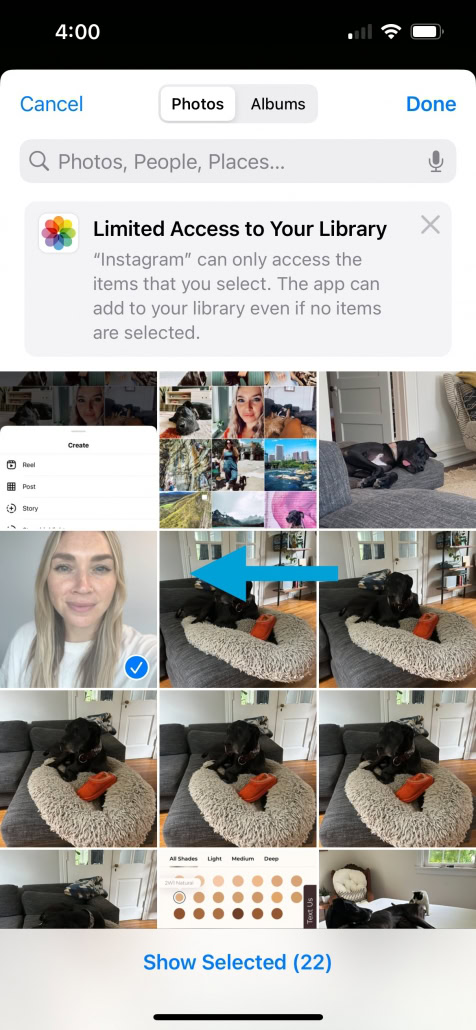
You can upload pre-recorded videos up to 90 seconds long to share as Reels. To do this, once you have the Reel creator open, click the square icon in the bottom left corner. This will open your phone’s library so you can upload your pre-recorded video.
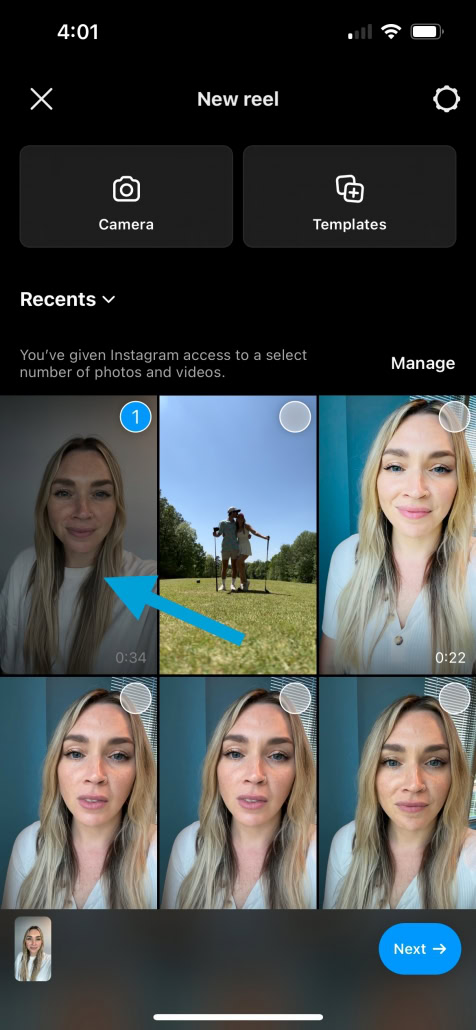
Select your desired video, and the editor will display your video and begin to play. Click “Add” in the top right corner.
You can upload multiple video clips to the Reel editor, as long as your total video stays within that 90 second time limit. Once you have “added” all of your desired video clips, click “Next” in the bottom right hand corner. And now you’re ready to edit and optimize!
Pro Tips:
- Once you’ve added your video clip(s) and selected “Next”, you can reorder and trim your video clips as you like by selecting “Edit Clips” in the bottom left hand corner of the editor.
- Videos are best recorded in the vertical format when you’re sharing to Instagram–they’ll be displayed in a 9:16 aspect ratio.
- Make sure you’re filming in a quiet location with a clean background for a more professional look.
- Reels can also be a great way to show off potential listings you have right now.
- Using the same workflow, you can also upload photos to the Reel editor to create a slideshow.
- Avoid the TikTok watermark (shoot your video on your phone, and then upload to Instagram & TikTok separately to edit within each of the individual apps).
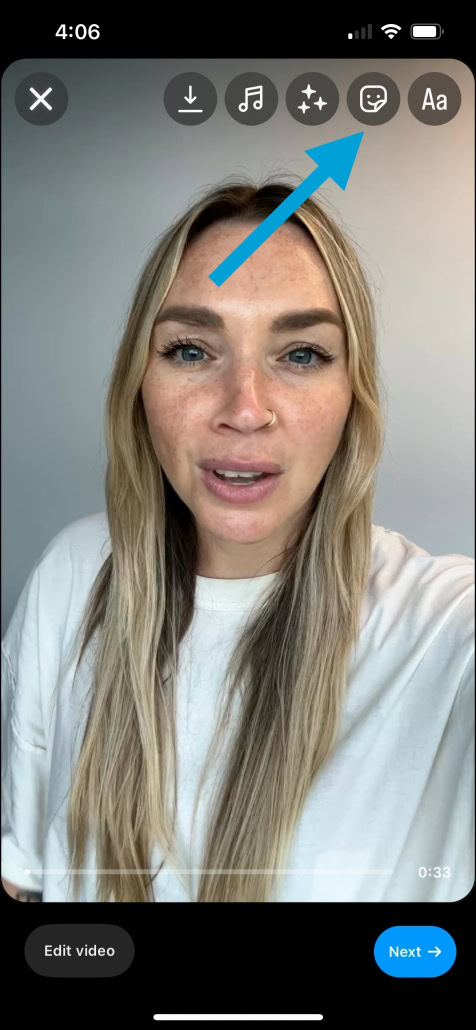
Step 2: Add Captions to Your Video (Using the Stickers Icon)
The great thing about Instagram stickers is that many of them are interactive, giving you even more opportunities to engage with your audience.
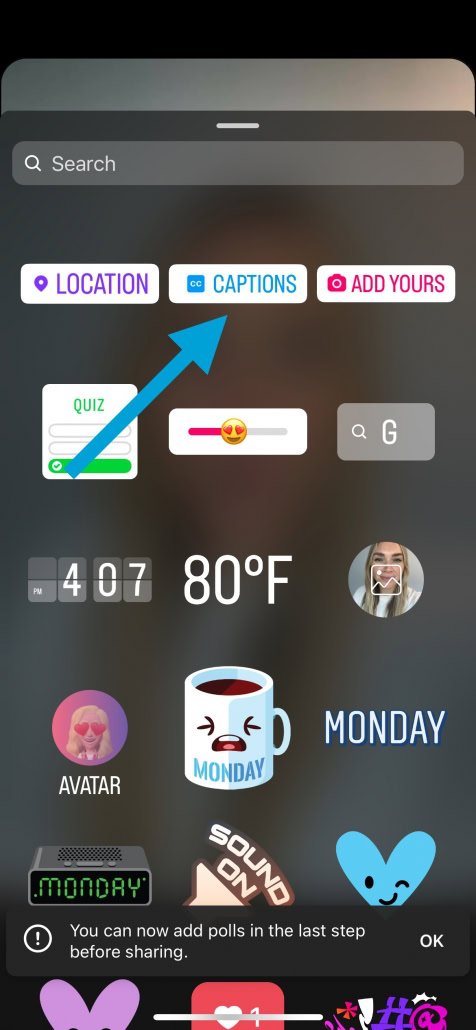
One sticker that you should ALWAYS include if your video has audio is the captions sticker. Tap the stickers icon and then select the “captions” sticker to transcribe your audio automatically and help viewers watch your reel without sound. This is crucial because 85% of users watch videos on mute!
After your captions are automatically generated, you can simply tap the text to correct any mistakes. You can also change the text color and animation style. After that, you can adjust the size of your captions by using your fingers to zoom in or out, as well as the placement of your captions by using your finger to drag them around the screen.
Pro Tips:
- Captions take a few minutes to generate depending on the length of your video. Adding captions before you add any background music can help speed up the process.
- Try out these stickers in Reels now to help pull in new viewers who can become part of your storytelling:
- Poll: Making a two-part reel? Poll your audience on what should happen in your next video so they can help shape the storyline themselves.
- Quiz: Put your audience’s skills to the test (or teach them something new) with this sticker.
- Emoji Slider: Let your audience share how your content makes them feel with a sticker that makes the heart-eye emoji even more powerful.
Step 3: Choose Your Music (or Audio)
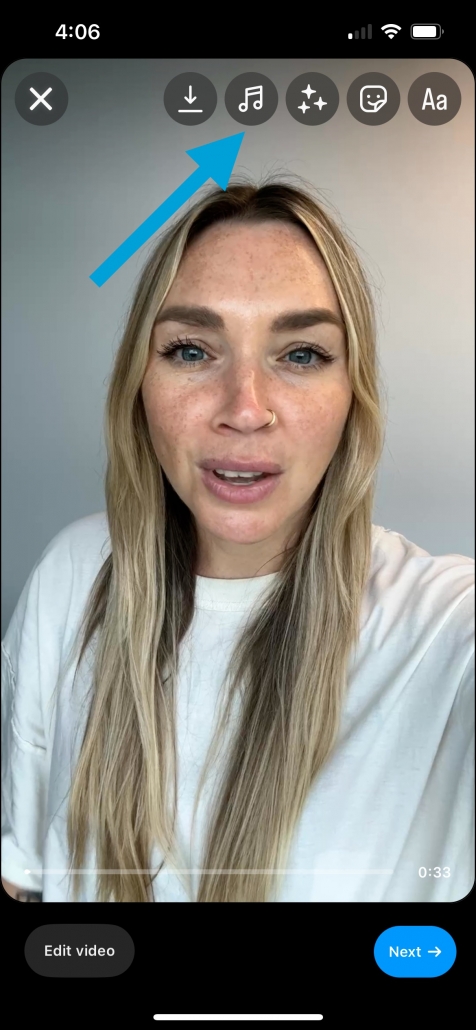
Music is the driving force of short-form video trends like Reels, so adding some trending audio or music is critical to racking up views. However, this feature is only available for Creator accounts so if you have a Business or Personal page, this option won’t be available.
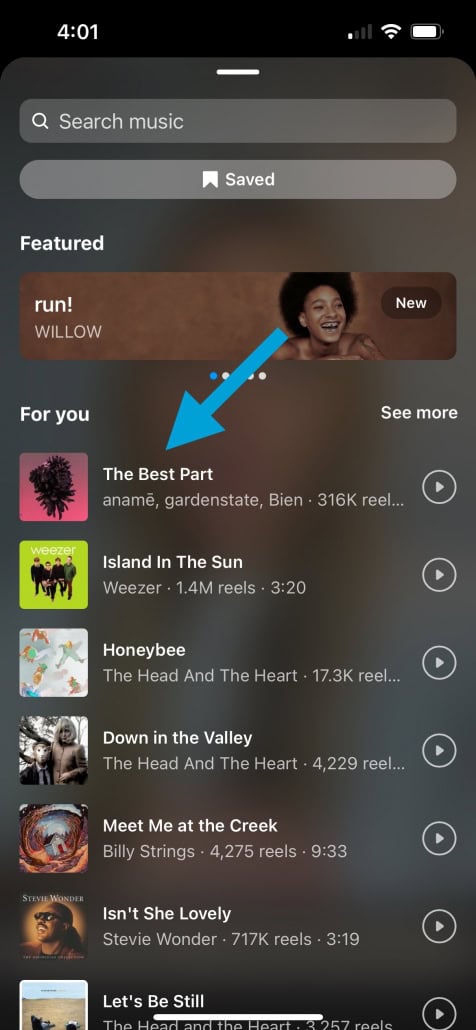
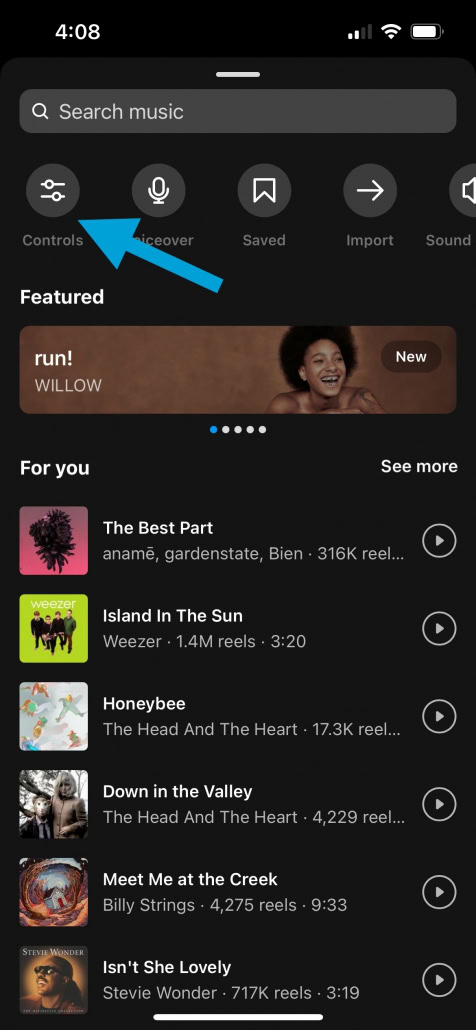
When you click on the music icon within the Reel editor, Instagram will automatically suggest popular options and trendy songs. You can even see how many other people have used a song or audio snippet in their Reel, which is a good way to hop on trends.
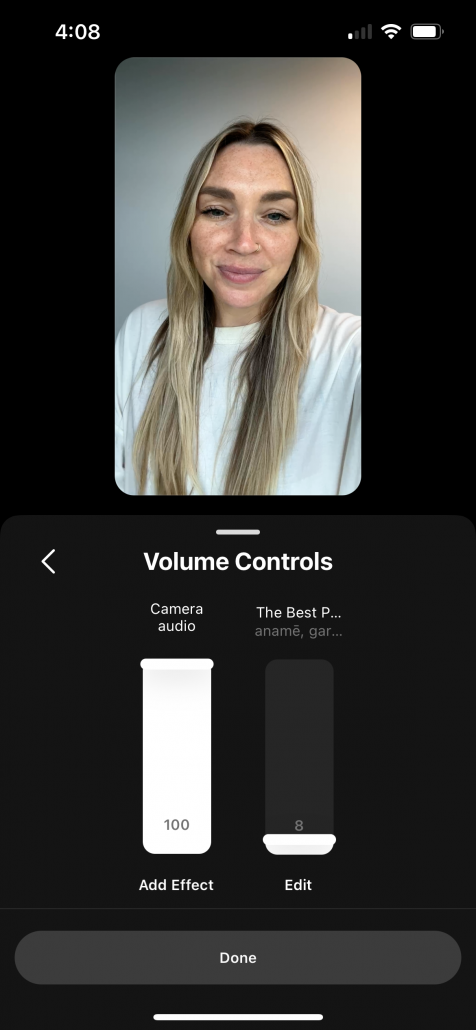
Once you’ve selected your audio, you can select the music note icon to reopen the music library. At the top of the music library, adjust the volume of the audio on your original video as well as the volume of any music or sounds you’ve added to your video.
This is especially important if the video you uploaded has its own audio that you want people to hear–if you’re talking about the market or sharing a listing spotlight–you just want some light background music for added effect.
Pro Tips:
- Instagram Creator accounts have access to a much wider library of music than personal or business accounts. Check out this article to read more about the different types of Instagram accounts and find out which one is best for you.
- You can save songs that you find for future Reels, and you can also choose to import your own “original audio.”
- Add a voiceover to your Reel by tapping the arrow editing icon after you’ve added your music. By tapping the microphone at the top of your screen, you’ll open a voice recording window to add to your Reel.
Step 4: Choose an Effect
If you’re like most people, the thought of being on camera or in front of an audience can be intimidating. One of the big obstacles people face with video marketing is getting comfortable with how they look on camera. The good news? You can easily give your confidence a little boost by applying an effect or filter to your video!
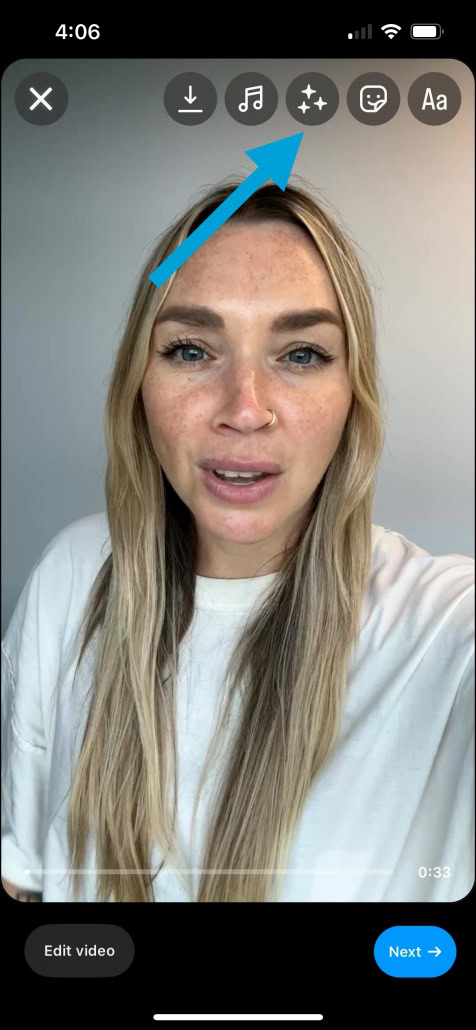
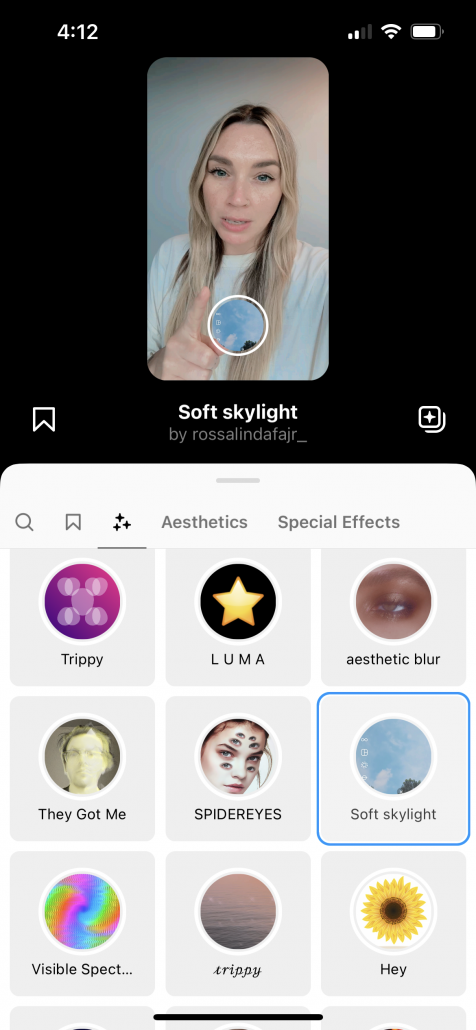
The “sparkle” icon at the top of the editor opens up a variety of effect options, from subtle filters to goofy animations.
This is where you can use your creativity to explore and test effects that will make your Reels stand out. Similar to music, you can save your favorite effects and browse trending effects on the platform.
Pro Tip: If you notice a cool effect (or audio) on a Reel, you can look it up by clicking the video and it will be listed at the top of the video. Plus, filters add links which can help get your video more views.
Step 5: Add Text Overlay
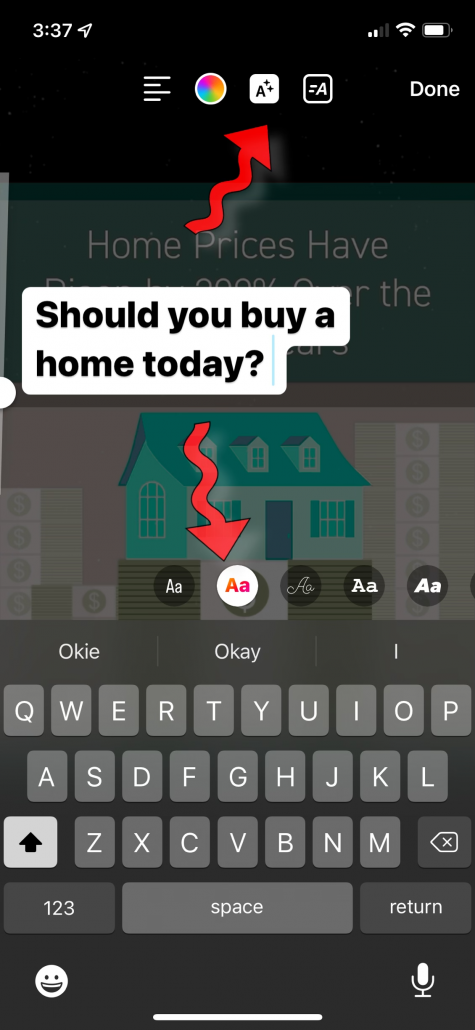
Captions are just one option for adding text to reels. It’s a great best practice to add a title to the video using a text overlay so that your audience can get an idea of what the video is about, before they even watch it.
You can also add overlays by tapping the Aa icon.
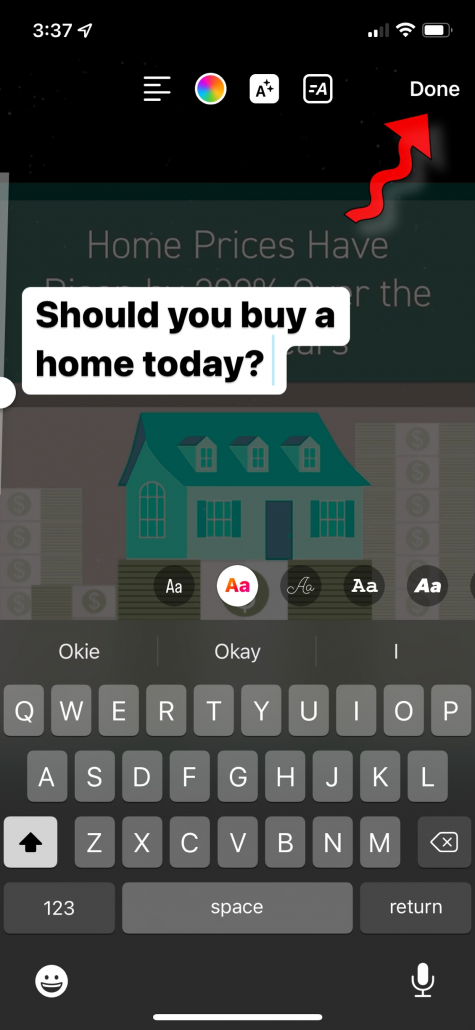
Enter the text, choose a color or use the color matcher, and tap the animation icons to add movement. Tap “Done” when you’re finished, and then you can adjust the size and placement–just like you did with the captions.
You can add more text to your Reel by repeating the workflow. Then you can use the timeline at the bottom of the screen to adjust when and for how long each text block should appear.
Pro Tips:
- Keep your on screen text short and sweet, you’re just simply highlighting any crucial information or the key message behind the video.
- Remember that most people will view your Reel in their regular Instagram feed (as opposed to within the Reels Feed). When displayed in the regular feed, Reel’s are displayed in a cropped square format, so keep this in mind when you’re placing your text.
- To make sure your text stays within the parameters of this cropped version, keep your text placement within the lines that pop up while you’re moving text around within the editor. If you move your text too far to the top/bottom/left/right of the screen, you’ll see lines appear to let you know that your text is outside of the suggested parameters.
Step 6: Optimize & Share
Once you’re happy with your Reel, you’re ready to optimize and share! Select the “Next” button from the editor to finish optimizing!
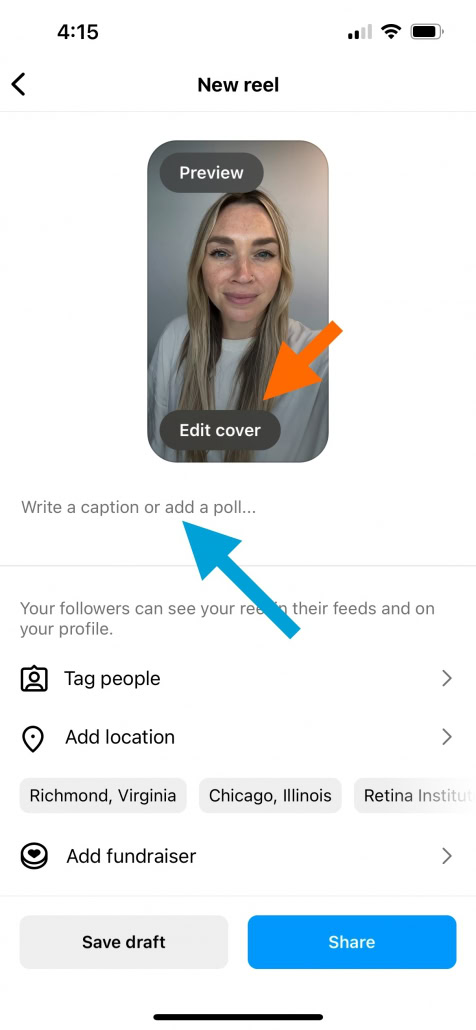
On this screen, click the display of your Reel at the top where it says “Edit Cover.” A cover image–also known as a thumbnail–can make or break your video–it can be a huge determining factor in whether or not someone chooses to watch your video at all.
You can select a clip of your video to use as the thumbnail or you can upload a thumbnail image from your phone’s library. But we recommend to choose a clip that includes your text overlay title or one you’ve created, so people can immediately tell what your video is about.
Then, there’s just a couple final steps until your Reel is ready for the world:
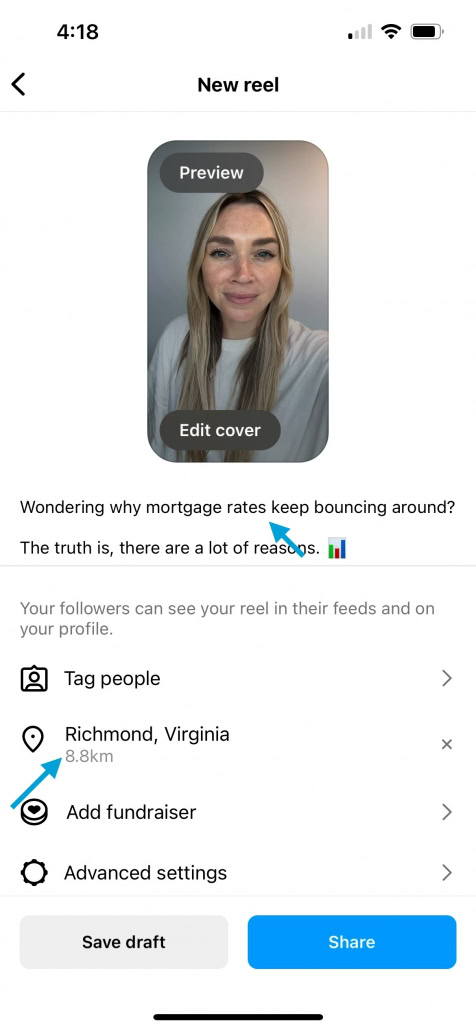
Write a relevant caption and include at least 3-5 hashtags per Reel.
Hashtags are one of the best ways to boost your video’s reach and get your posts in front of more eyes.
Tag any relevant parties to your Reel, such as your agency or brokerage.
If you’re showing off an individual or business, tag them as well. And if you’re repurposing any of your Keeping Current Matters content, be sure to tag us so we can follow along and see what you create!
Add your location–whether that’s where your market is located or address-specific.
These tags are another way to boost engagement and visibility. Plus, you’re a real estate agent and tagging your local market is extra important!
And that’s it! You’re ready to hit share!
Pro Tip: Don’t forget that you can also repurpose your Reel as a story, or use it on another platform entirely! A great rule of thumb is to send it to at least 10 people in your followers to boost engagement. It doesn’t matter if it’s clients, neighbors, family, or friends. Share it up!
Bottom Line
When it comes to building a brand that helps you stand out as a market expert, video is the best way to do it and Instagram Reels are one of the most rewarding places you’ll see results.
With this step-by-step guide, we’ve shown you all the ins and outs to creating successful and impactful Instagram Reels in just minutes. And while this may be a good base to start with, there’s always room for creativity and inspiration so you can really make your videos your own.
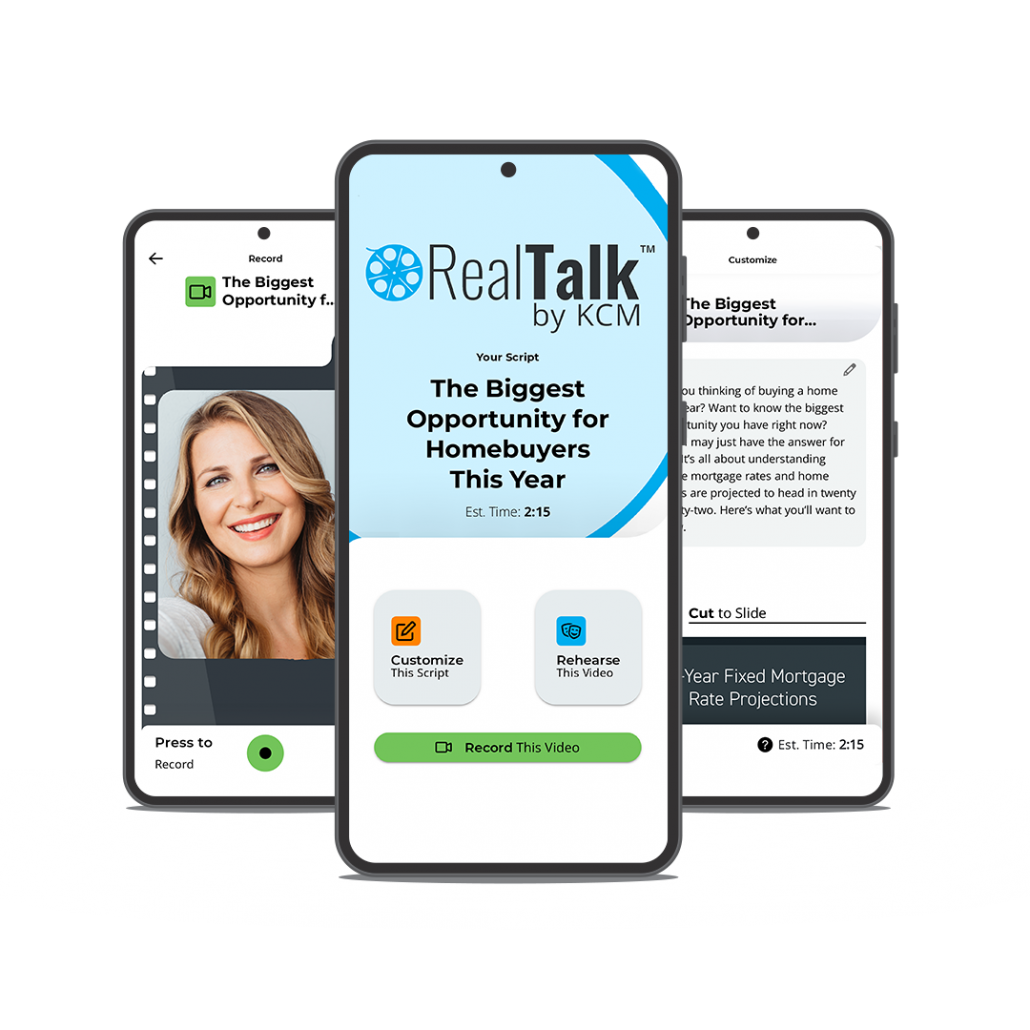
Plus, we’ve made it extra easy with our all-in-one video creator made specifically for real estate agents. With a built-in teleprompter, new weekly market update scripts, and no editing required, there’s never been a simpler way to start making videos.


